October 17, 2016

Pencil Keeper Genius!

Hi friends!

Are you seriously frustrated with the number of pencils your students lose???  I know I was.  I blogged about a pencil holder I made for my kids that worked really well.  You can read about that post here.  However, as educators we are always striving to improve.  This year, I'd like to introduce you to my newest pencil loss solution!  It's so simple and effective you'll wish you knew about it sooner.

Go to the store and buy 2 things - bubble tea (aka milkshake) straws and duct tape.  I teach second grade so I bought really cute gummy bear duct tape from Staples.

Cut your straws so they are about 3 inches long.  Use a piece of duct tape to attach a straw to each student's desk.  That's it!

Remind students that their pencil LIVES in it's "home" when it is not being used.  Do random pencil checks and give out stickers if needed.  Get your kids excited about taking care of their pencil.  (p.s., I keep a stockpile of sharpened ones on my desk which I quickly trade with a student it their's breaks).

I'm going on DAY 26 people!  Seriously, DAY 26 without losing a pencil.  In second grade.


post signature

October 24, 2015

BOO! Easy Halloween Art that will WOW your kids!!!


It's almost Halloween!!!!  I am loving the beautiful fall colours here in Ontario.  Reds, oranges, yellows, and greens.  Here is a little art project I did with my Gr. 2's to get us into the Halloween spirit (pun 100% intended!).  I saw the idea on Pinterest here and just had to try it myself!!!  I'm not sure if this is how it was done originally, but I've given you the step-by-step of how I did it with my kids below.  Have fun!


Materials:

- 12 x 18" cartridge paper (or other good white paper)
- white liquid tempera and blue tempera paint
- metal pie plate for each table group

- haunted house foam cutouts from Dollarama (1 per student)
- black sharpie marker


Method: Discuss value (lightness or darkness of a surface) with students.  It is one of the 7 elements of art.

- Squirt a large amount of white tempera paint into each group's dish.
- Have students paint a white full moon shape slightly away from the upper corner of the page.
- Add 1 or 2 drops of blue tempera to each dish. Have students mix it up so it is entirely blended, go around the white moon with the slightly tinted blue paint. Instruct students to overlap the moon slightly so the lines get blended.
- Add 1 or 2 more drops of paint. Students mix. Paint a larger circle around the first one. Encourage students to paint thick bands of colour. At this point, the colour bands should now be more of a "u" shape.
- Repeat process of adding drops of blue to the white paint until students have covered their page.
- Glue foam haunted house cutouts onto page (we used glue sticks).
- Colour in windows with white pencil crayon.
-Model how to draw trees beginning with a "Y" shape using sharpie.
-Remind students that odd numbers look better than even numbers in art (e.g., 1, 3, 5 or 7 trees rather than 2, 4, 6, or 8).


post signature

August 27, 2015

The Bat Cave!

Hi everyone!

I'm coming at you today with a little DIY I did for my classroom.  This year I'm changing things up and going with a superhero theme.  I think my Gr. 2's are going to love it!  My "Star of the Week" this year is now going to be the "Superhero of the Week" and one of the special privileges he/she will enjoy is getting to read in my new super-duper Bat cave!

Here's how I made it!

You will need:

- large cardboard box (I used an appliance box)
- yard bags or paper lunch bags
- spray adhesive (you can buy this from Michaels or Home Depot)
- spray paint

**My box did not have a bottom on it.  If you are using a regular cardboard box you can choose to cut the flaps off the bottom if you want or leave them on.

1.  Cut an arched opening on one side of your box.

2.  Rip up your lawn bags into large-ish pieces.  I separated the layers of the bags to make it a bit easier to crumple them up and glue them on.

3.  Crumple up a piece of paper bag into a ball.  Slightly uncrumple it (is this even a word?).

4.  Spray a bit of adhesive onto the cardboard box.  This stuff works best when it is slightly tacky so you don't have to spray a lot.  Attach your uncrumpled ball so it resembles a rough rock by pressing down on the paper bag and shaping it with your hands.

5.  Cover the top and sides of the box with crumpled paper bag pieces.  I chose to leave the back uncovered so I could put it up against a wall.

6.  Spray paint (or leave it as is).  I used a mix of grey and dark brown.

Add a pillow inside, a batman sign and voila!  You've got your very own Bat Cave!

The MOST special place for your special star of the week!

For visual learners like me - here are the step-by-step pics!

post signature

March 28, 2015

I don't have a pencil Mrs. Palleschi!!!

Sound familiar????  I think I've probably gone through about 4 boxes of pencils this year!  I think I've finally come up with a solution for keeping track of them while teaching responsibility at the same time!  I took a simple cardboard box and taped it shut.  Then I poked holes (evenly spaced) in one side of the box with a sharp tool I found in my classroom.  I have 20 students, so I made 20 holes.  A screwdriver would probably work well. Then I used one of our NEW pencils to create the size holes I needed in my box.  I wrapped it up with cute wrapping paper and re-poked the holes through the paper.  Voila!!!!  A cute, simple storage solution for our pencils.

Management of my new pencil system is simple.  Students pick up their pencil in the morning (each student has their own student number which corresponds to the numbers I put on the pencils).  They are responsible for keeping their pencil in a safe place all day.  We had a conversation about where a good place to keep them would be.  At the end of the day, students must put their pencil back in the correct hole in the pencil holder (great problem solving since I did not put numbers on the actual pencil holder) as a ticket to leave!  So far so good!  I may have told them they have to sleep at school if they lose their pencil.


post signature

October 20, 2014

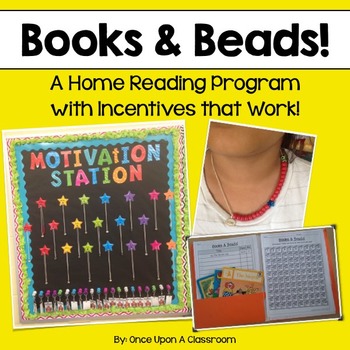
MOTIVATION STATION!!!

I'm just stopping in quickly to show some pictures of how I display my student motivation board for my Books and Beads At-Home Reading Program!  Sharon K. writes: 

"Love it! Would you have a picture of how you display the bead collection/necklaces in the classroom?".

I have a bulletin board that displays student necklaces.  I purchased the necklaces from 8seasons.com.  They were SUPER cheap and work perfectly with Books & Beads!!!  I also purchased these cute little charms from 8seasons.com that say "I Can" on them so each student would start with something on their necklace.  I bought little star die cuts and wrote the students names on them.  I used a pushpin as a "hanger" for the necklaces.  


Students earn 1 red pony bead for every book they read.  Chapters books earn 5 pony beads per book read.  Students earn 1 very special star bead for every 100 books read!  We use Raz-Kids in my classroom as well as books from the class library.  Students are free to read any book they wish!

Want to do this in your classroom???  It's easy!  Click on the picture below to go right to my store.  Books & Beads is just $3.00 and the kids and parents LOVE it!!!


August 21, 2014

Teacher Week Day 4: When!!!


It's been a few years since I've been in the classroom.  I've been busy at home with my three little ones.  I'm ready to go back but I'm teaching a new grade this year so there are lots of changes all around.  I'm moving up from first to second grade - something I've wanted to do for a long time!  I just love the second grade curriculum.

The first thing I did to get myself ready is read the Grade 2 curriculum.  Here in Ontario we've got different books for each subject and it's broken up by Overall Expectations and Specific Expectations.
This is what our Language Curriculum Document looks like!


To organize myself, I made a chart (colour coded of course!!!) in Powerpoint.  I divided it by subject and then by month.  I thought about what would make sense when and started plotting the learning expectations on my chart.  For example, in second grade we learn about growth and changes in animals.  I thought the best time to do this would be in the spring when we can go outside and examine nature coming to life.  I save the more difficult concepts for later on in the year like multiplication and division to give my kids a chance to develop their basic skills first.  Here is what my long range plans look like!


The numbers correlate to the expectations in our curriculum documents.  Kind of like the Common Core Standards.  The items I've indicated to go year long are those we will do everyday like our Poem of the Week and writing journals.


I've also made reference to some of the activities we will be doing in our learning like making a fruit salad for our fractions unit.  I can't wait to make Leprechaun traps in March as part of our Structures/Mechanism and Movement Strand!


I print out poster sized plans and attach them to the wall behind my desk.  This visual really helps me stay on pace with my units.  It's great for planning upcoming units too.  I always know what's coming up next.

How do you organize your day?  Link up with us and share your plans!


August 20, 2014

Teacher Week Day 3: Organization Station!!!


Hello friends!  It's Day 3 of our Teacher Week blog hop!  Today's post is all about staying organized.   Music to a teachers ears right???  Here are 3 ways I keep things straight in my classroom!

1.  LABEL, LABEL, LABEL!  I am a bit label crazy!  It's helps me stay organized because I am also a huge lender-outer (is that a real word?) of my stuff and have a hard time remembering what I've lent out! My colleagues are very honest thank goodness but my personalized stamp definitely seals the deal!!!  I used to print stickers with my name on them and stick them to my books.  Then I decided to invest just $25 to get myself a personalized stamp!  SO MUCH easier, cheaper, faster!!!!  I stamp all my books, centres, games and anything else that gets laminated!  I even ask my kids to bring me any book they find in our classroom that doesn't have a stamp on it.  It's like a fun little treasure hunt for my students!  Just google "teacher stamp + from the library of" and you'll get a ton of results!!!


2.  Long Range Plans!
I keep a huge print out of my long range plans attached to the wall behind my desk.  I'm teaching a new grade this year so I don't have a picture of it yet but I will post it as soon as I can!  Having the whole year mapped out in view keeps me on track.  My long range plans are colour coded, divided by subject and have approximate teaching times for each unit.


Did you know you can print poster-sized pages at home???  Dragonflies in First has created this easy to follow tutorial!  Check it out here!


3.  Product Catalogue!
Yup!  That's right!  I made my own product catalogue :)  If you are like me you have probably downloaded a whole bunch of awesome freebies and other units that you sometimes forget you have. I used my good friend Ashley Schroeder's "What Do You Own" template to put together a binder full of product covers.  I simply flip to the section I need (i.e., Math Resources) and find the unit I need (i.e., Fractions).  This is a definitely plus when planning!


Now it's your turn!  How do you stay organized in your classroom?  Link up with us and share your great ideas!

post signature